How to run an application on Windows startup that also has administrator rights...
Running an application on Windows startup with administrator rights can be very useful.June 9, 2024
For our purposes, we are going to set our PC Mac Dock for Windows to run with admin rights on startup... 👽 😎
Running an application on Windows startup with administrator rights can be a useful way to ensure that certain programs are always available and running optimally. However, it’s important to note that giving an application administrator rights can pose a security risk if the application is not trustworthy. Therefore, only grant administrator rights to applications from trusted sources e.g. SSuite Office Software... 😏 🤩
For our purposes, we are going to set our PC Mac Dock for Windows to run with "Administrator Rights" on startup, since it already opens on startup. Please remember to remove the "PC Mac Dock" shortcut from the "Common Startup" folder before creating a new task on the "Task Scheduler", otherwise there will be two docks running on system startup.

All of you might have wondered as to why some of our applications e.g. WordGraph, NetVine, and Accel Spreadsheet etc. have this very annoying attribute when being run on Windows. Well, for me this has become quite necessary since most of our applications are now running with "Administrator Rights" thanks to the paranoid Windows system blocking hardware access to non-administrative applications.
Not having these "Administrator Rights" prevent our applications from accessing hardware like for example your local storage devices, printers, protected folders, or any other hardware connected to your computer.
So to prevent Windows from asking you every single time when starting an application for "Administrator Rights" when using our PC Mac Dock for Windows, we are going to set this dock to automatically start with admin rights on Windows startup using the task scheduler.
Doing this will prevent the popup Window from appearing and the application will start as normal without any annoying interruptions while being run from our PC Mac Dock for Windows. Most of our applications found on our PC Mac Dock will also now run much faster as before due to the automatically rights elevation of the dock.
This method may be used on Windows 7 and on every other Windows system upward...
Here’s how you can set up the PC Mac Dock application to run on Windows startup with administrator rights:
Step 1: Create a Task in Task Scheduler
The first step is to create a task in the Windows Task Scheduler that will run the application at startup. To open the Task Scheduler, type “Task Scheduler” in the "Type here to search" editbox and hit Enter, or just simply use the PC Mac dock to access Windows's administrative tools folder where it is located.
Step 2: Open the Task Scheduler
When the Task Scheduler opens, click and open the main folder, then create a new folder with a new name. This name could be anything you like, as can be seen in the below screenshot.
Now right-click inside the panel, on the right-hand side, like below and select the "Create New Task..." option on the popup menu...
In the Task Scheduler, when the new window wizard appears and under the “General” tab, give the task a name and make sure to check the “Run with highest privileges” box at the bottom.
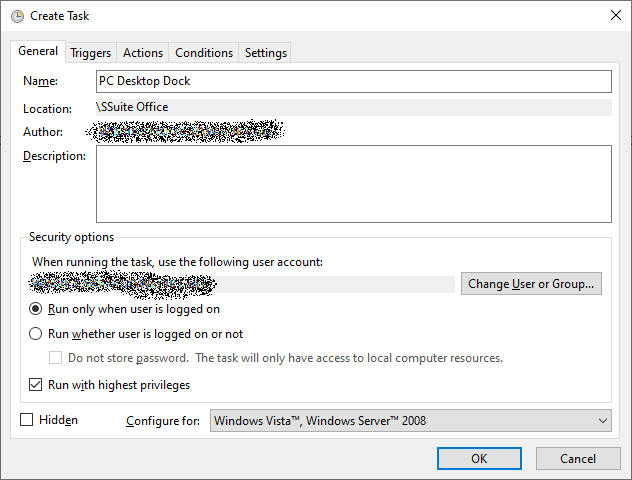
Step 3: Setting the trigger to start the app
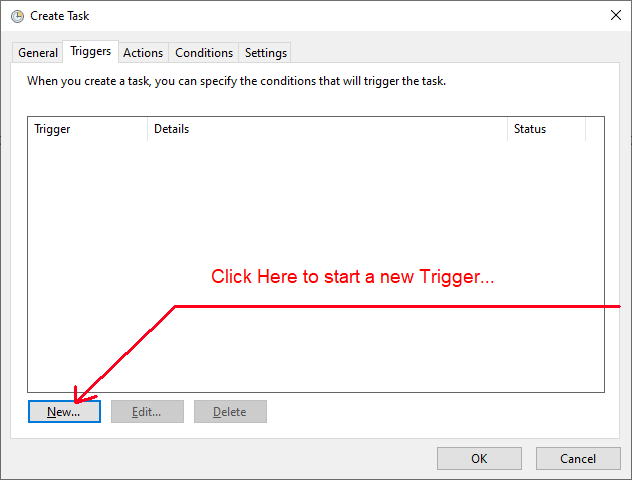
Under the “Triggers” tab, click on the “New” button on the bottom left side, as seen below...
Then select “At log on” in the “Begin the task” drop-down menu. Select to delay the task for 13 seconds when Windows starts. The time can be custom set when you enter the editbox manually, this helps to run PC Mac Dock properly everytime.
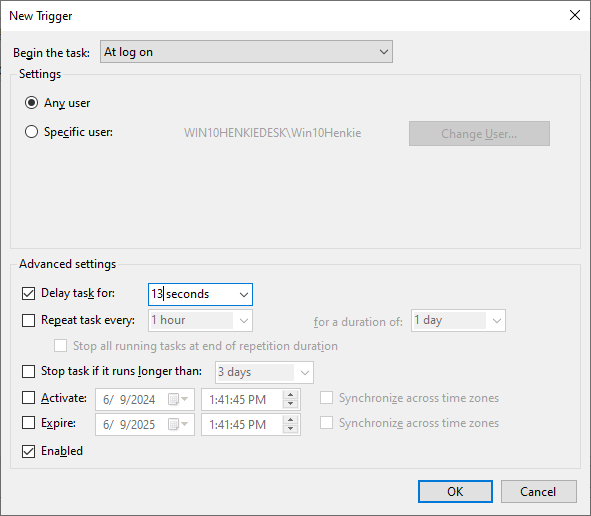
Click the "OK" button when you're done.
Step 4: Creating the action part of the setup
Under the “Actions” tab, click on the “New” button available on the bottom left side, then select “Start a program” in the “Action” drop-down menu.
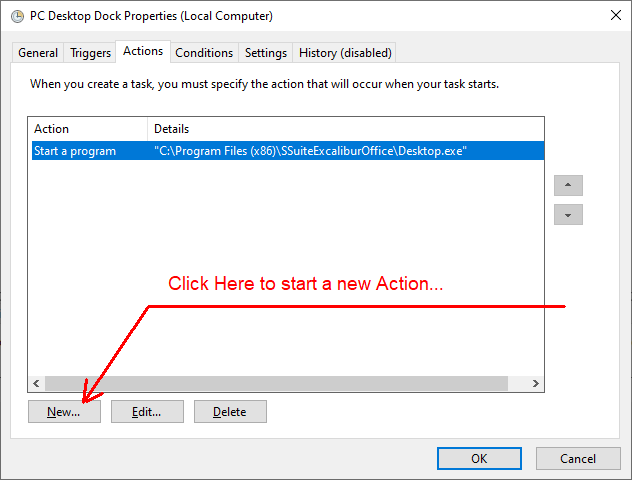
Click on the “Browse” button and select the EXE file of the program that you want to run with administrative privileges on your system startup, in this case it would be our PC Mac Dock for Windows... 😎 Remember to add a path in the "Start in" editbox.
Just copy and paste the application's path minus the executable's name e.g. "C:\Program Files (x86)\SSuiteExcaliburOffice"
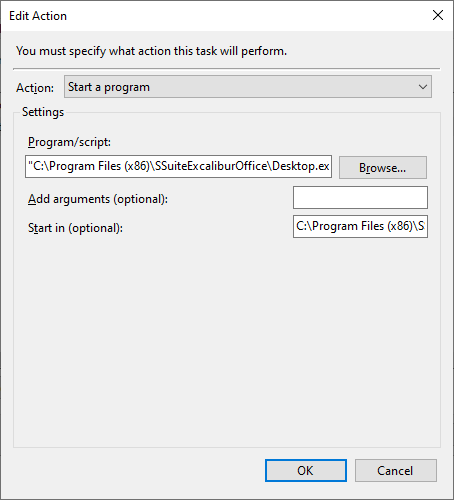
Click the "OK" button when you're done.
Step 5: Special conditions on different hardware
If you’re a laptop user, it’s important to configure the “Conditions” tab. In the “Conditions” tab, uncheck the following two checkboxes: “Start the task only if the computer is on AC power” and "Stop if the computer switches to battery power". This ensures that the scheduled task will run regardless of whether your computer is plugged in and charging.
Just uncheck all the options like below to be sure there aren't any complications on your laptop!
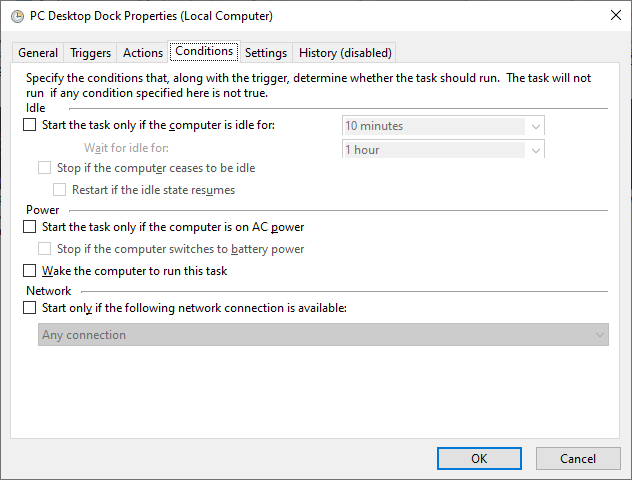
On the below "Settings" wizard tab, just leave the two options selected and there after you are finished with the whole process.
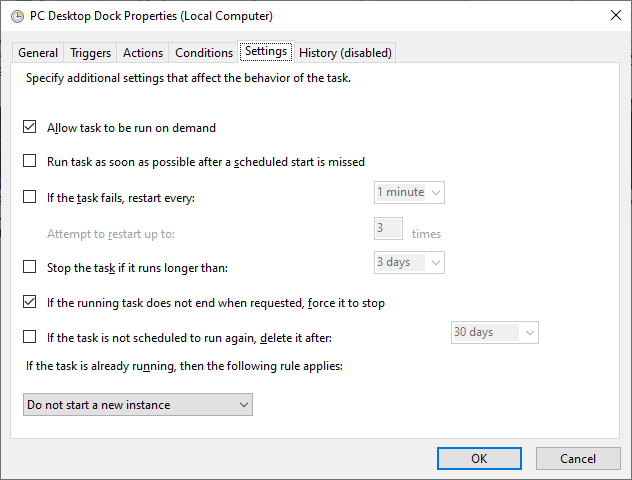
Click the “OK” button when you're done to save you're newly created scheduled task. Now, the next time you start your computer, the application should run automatically with administrator rights.
Remember, running an application with administrator rights can pose a security risk, so only do this with applications from trusted sources. If you follow these steps carefully, you should be able to run any application on Windows startup with administrator rights.
Enjoy running our software applications without any annoying interruptions from Windows, even faster than before!
...Go Online and enjoy complete productivity freedom...
About Us
We're just two guys in a garage, what else is new... right?
It's almost a cliche, or is it? I don't know, maybe...
